The Complete Guide To Your Co2 Treatment
Hello from your Dccm team! We are so excited that you have decided to move forward with the gold standard in skin rejuvenation…The CO2 Treatment. We hope that this guide is useful to help prepare you for the treatment. Remember that this is an emotional journey as much as a physical one, and we are always here to support you along the way; no question is too small! During business hours, you can call us at 603.783.1087 or, after hours, just email tara@thedccm.com, and we will get back to you as soon as possible.
Prior to your treatment day, you will want to grab a few things at the grocery store or pharmacy. Some of the items are available at Dccm and can be picked up on the day of treatment.
Pre-treatment Shopping List
- White Vinegar
- Quality paper towels – Bounty is great
- A large tub/tube of Aquaphor (tub is easier to use, but tube works too)
Pre Treatment Home Checklist
- Nice warm comfy clothes
- Clean sheets
- Ice packs in the freezer (we will send you home with some too 🙂
- A stack of clean pillowcases or clean towels to wrap your pillow (the Aquaphor will get on them, so don’t use your best pillowcases)
- A water bottle by your bed – stay hydrated!
- A good book/ movies/ TV show to binge on when you get home.
Available at Dccm
- ZO Gentle Cleanser
- ZO Sunscreen
- ZO Pigment Control Protocol – to reduce chances of hyperpigmentation
On Treatment Day
- Wear comfy warm clothes – the numbing can make you feel chilly, so we love soft sweaters and leggings for this!
- Wear a shirt with a wide collar or one that buttons/zip up – we will put some aftercare on your skin, and we don’t want it to get on your clothes when you decide to change.
- Have a good protein-rich breakfast, and go easy on the caffeine – the numbing can make you jittery, which will help avoid that feeling.
- Remember: No makeup at all, please! Trust us; removing it is a pain.
Day 0: Treatment Day!!
Please arrive the day of your appointment freshly showered (you won’t want to after treatment for a few days) with a clean face free of any lotion and makeup, even eye makeup. We will have you sign treatment consents and take before photos to document your skin’s texture and appearance, and so you can see how amazing your results are after!
A topical numbing cream will be applied to the treatment area to prepare you for treatment, and you will relax with this on for about an hour. We will then remove the numbing cream and take you into the treatment room to see Tara.
The treatment takes a total of about 20 minutes. First, we will use injectable numbing to ensure your comfort. Next, Tara will do a test patch with the CO2 laser to check for comfort and then begin the treatment. After your treatment, she will rinse your face with sterile saline and apply a thin layer of aftercare.
Your face is going to feel hot for about 4 hours following treatment. Go home, lie down, and take a nap on your back so you can sleep through the hot phase, applying ice through tissue as necessary. If you are not naturally a back sleeper, you can put one pillow on either side of you, so you don’t roll over.
Once you wake up, your skin will be red, dry, and look like you have little grids all over it. Apply a layer of Aquaphor (you are going to want to reapply this anytime you feel dry, you should have a nice sheen of Aquaphor all over the treatment area at all times), relax, watch a show, have dinner, do you 🙂 Then, do a vinegar soak and apply another layer of Aquaphor before bed. Your goal should be 3 vinegar soaks daily for the next 4 days.
Detailed Instructions For The Complete Vinegar Soak Aftercare Protocol:
Supplies:
A clean small mixing bowl
Nice thick paper towels (Bounty is great)
Distilled white vinegar
Warm (soothing, not scorching) water
Calm Drops (optional)
Aquaphor
Complete Vinegar Soak Protocol Instructions:
- Take a measuring cup and mix ⅓ cup of distilled white vinegar with ⅔ cup of warm (soothing, not scorching) water for a total of 1 cup. Pour the mix into your bowl.
- Take two bounty half sheets or one full sheet and fold in half. Dip the paper towels in the vinegar water mix and ring out some of the excesses, so they aren’t dripping all over the place but are still well saturated. Blot the paper towels all over your face in pressing motions, no scraping, rubbing, picking, or smearing!! We don’t want any of your skin to peel off before it is ready. Repeat the blotting all over the treatment area with fresh paper towels 3-4 times. The vinegar should sting but not be incredibly painful.
- Empty the bowl and fill it up with only clean, warm water. Dip fresh paper towels and blot them all over your face to rinse the vinegar away. Repeat with fresh paper towels 2-3 times as necessary.
- Apply 10 drops of Calm Recovery to your clean fingertips and blot all over the treatment area. Then apply 10 drops of the APTT3X and blot all over the treatment area. Repeat this step every 4 hours while awake.
- Apply a thin, uniform layer of Aquaphor to your face (you will need about a quarter-sized glob) with the same blotting motion. Your skin should look glistening with the Aquaphor on it. The goal is to let it sit on top of the skin as a barrier, not to let it soak in like lotion. You should reapply Aquaphor as necessary throughout the day if you dry out.
Remember!!
● Change your pillowcase every night, or lay a fresh, clean white towel over the pillow.
● Do Not expose your skin to the sun for extended periods for the first seven days; this is crucial to prevent scarring and hyperpigmentation.
● You will be dry and red for up to 7 days, and your skin will remain pink and slightly
tender for up to 3 more weeks. Makeup can be worn once the skin’s texture is even again and all of the scabs and flaking are gone. This usually occurs by days 3-5. If you have any questions, please don’t hesitate to call the practice at 603.783.1087 or send us an email at tara@thedccm.com.
For 7 days, avoid
● Direct sunlight
● Swimming
● Sweating, exercise, and vigorous activities that cause sweating
● Tanning beds all together
● Powered cleansing brushes (Clarisonic etc.)
● Alpha and Beta Hydroxy Acids
● Retinol (Vitamin A)
● Vitamin C (low-pH formula)
● Scrubs;
● Anything perceived as “active” skincare.
● If you are unsure about anything, just ask!
All the best on your recovery journey!
Is This Normal? A Guide To Co2 Recovery
Day 1: Treatment Day – Take the rest of the day off
● You are going to want to have nothing planned for this day; you just want to have the freedom to go home and go to bed if you wish.
● Hot, red skin for about 4 hours after treatment, calming down by that night
● Cracking, oozing, scabs, skin grids, brown spots, and yellow scabs are all normal.
● White blanched skin spots under the laser dots are normal; the epinephrine in the numbing causes skin to blanch.
● Epinephrine can also cause you to be a bit emotional; this is all normal.
● Follow the complete vinegar soak aftercare protocol at night before bed.
Day 2: Post Treatment – Take this day off
● You will feel fine today but look pretty beat up.
● No longer hot.
● Swollen (potentially including eyes and lips), red, a bit sore to the touch.
● Cracking, oozing, scabs, dot marks, brown spots, and yellow scabs are all normal.
● Follow your complete vinegar soak protocol 3x daily, reapply Aquaphor throughout the day as needed.
Day 3: Post Treatment – Take this day off
● Still swollen but less sore.
● Skin will start to tighten; reapply Aquaphor all day to avoid drying.
● Cracking, oozing, scabs, skin grids, brown spots, and yellow scabs are all normal.
● Follow your complete vinegar soak protocol 3x daily, reapply Aquaphor throughout the day as needed.
Day 4: Post Treatment – Take this day off
● Swelling continues to improve.
● Skin beginning to lift and slough, the skin underneath will be pink and blotchy.
● You can shower today if you have not already and use the Zo gentle cleanser in the shower to remove some of the old Aquaphor; some lifted skin may come off with the wash; this is ok but does not pick or peel at lifted skin to make it come off. You run the risk of hyperpigmentation and scarring.
● Continue with your Zo gentle cleanser am/pm and vinegar soak protocol 3x daily, reapply Aquaphor throughout the day as needed.
Day 5: Post Treatment – I went out shopping today; I was pink but not peeling
● Skin will continue to lift and slough off; remember, no picking!!
● If you see any active breakouts, DO Not Pop Them. This will spread bacteria on your delicate new skin, and the force of popping them will leave you with red marks and/or blood blisters that may cause hyper pigment and scar.
● Be extra conscious of your sun exposure for the next few days.
● Your redness will continue to calm down.
● Continue with your Zo gentle cleanser am/pm and vinegar soak protocol 3x daily, reapply Aquaphor throughout the day as needed.
Day 6: Post Treatment – I went back to work today
● Skin will likely finish lifting and sloughing today if it has not already
● Skin will still be pink, maybe itchy (NO scratching).
● Continue with your Zo gentle cleanser am/pm and vinegar soak protocol 3x daily, reapply Aquaphor throughout the day as needed.
Day 7: Post Treatment
● Your skin will still be pink but continue to fade.
● Itchiness is normal.
● Continue with your Zo gentle cleanser am/pm and vinegar soak protocol 3x daily, reapply Aquaphor throughout the day as needed.
● Look forward to your results!!
Day 8: Post Treatment (one week mark):
● Your skin will still be pink but continue to fade.
● Some itchiness is still normal.
● Continue with the ZO gentle cleanser wash morning and night and apply calm drops and Aquaphor afterward. You can stop the vinegar soaks.
● As your skin starts to improve, you can begin to switch over to using ZO Hydrating Creme instead of the Aquaphor; if needed, you can apply Hydrating Creme all over your face and touch up any dry areas with Aquaphor.
At about the Two Week Mark:
Your skin will still be slightly pink. To help reduce the remaining pinkness and decrease your risk of hyperpigmentation, we will have you start the ZO Pigment Control Protocol described below.
Zo Pigment Control Protocol Complete Guide
What is the Zo Pigment Control Protocol, and Why am I Using it?
The pigment control protocol is designed to prevent and remove unwanted skin pigmentation. This includes melasma, post-inflammatory hyperpigmentation caused by acne or laser resurfacing procedures, and photodamage caused by sun exposure. This system is the gold standard in treating all forms of hyperpigmentation. You will notice a drastic improvement to your overall skin tone and texture within just a few weeks of using these products.
This guide is designed to help you along the way, as this regimen is a prescription that can only be administered by healthcare professionals and should be strictly adhered to for best results. The following pages will describe how to use the regimen and how to transition off Hydroquinone.
Pigment Control with Hydroquinone Protocol
** Use for up to 3 months. Prolonged Use of Hydroquinone can cause rebound pigment or ochronosis. Do Not use for longer than instructed. **
Components of the Protocol:
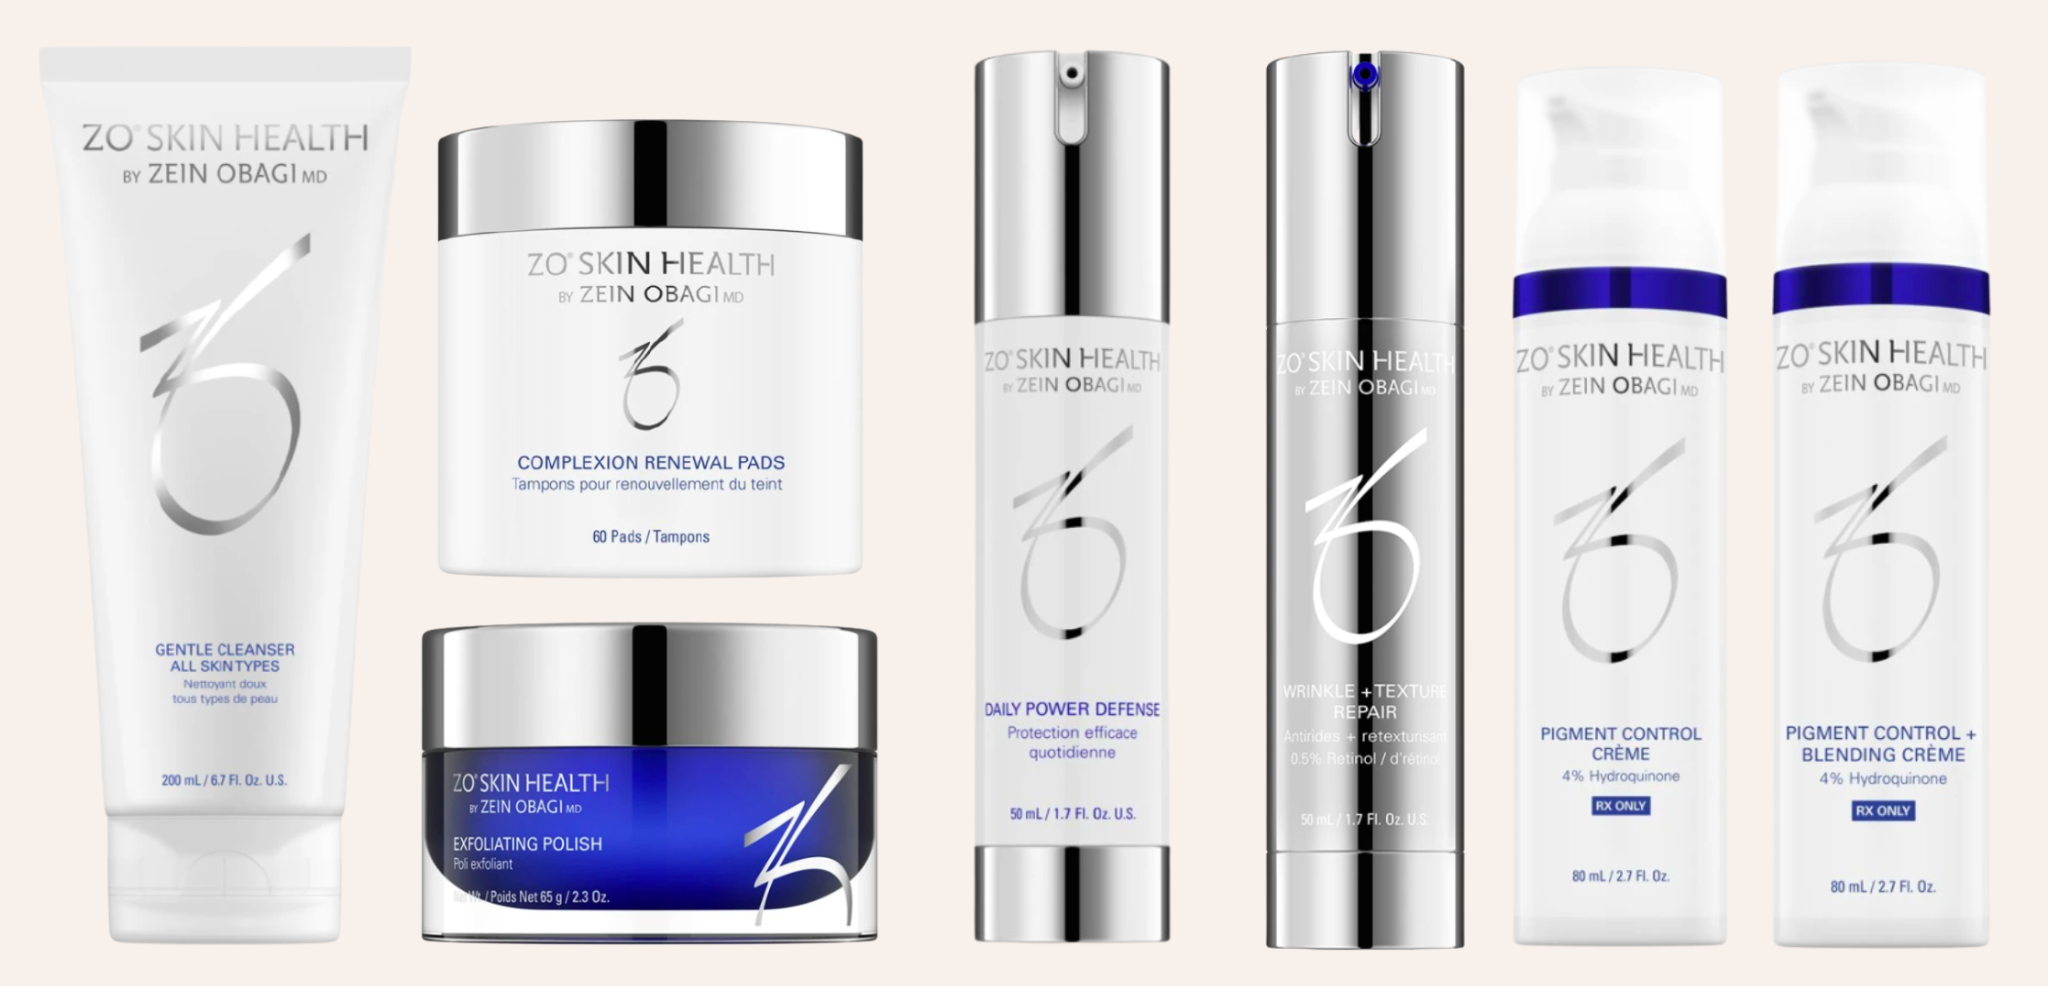
Getting Skin Ready (Gsr): Gentle Cleanser, Exfoliating Polish, and Complexion Renewal Pads
Skin Barrier Strengthener: Daily Power Defense
Retinol: Tretinoin OR Wrinkle + Texture Repair
Hydroquinone: Pigment Control Créme And Pigment Control + Blending Créme
Hydration: Hydrating Créme (as needed)
Detailed Instructions for the Protocol:
Daily AM:
- Gentle Cleanser
- Exfoliating Polish – Can be used in the shower and watered down for softer exfoliation
- Daily Power Defense (1-2 pumps)
- Pigment Control Créme (2 pumps)
- Hydrating Créme (as needed)
- Spf
Daily PM:
- Gentle Cleanser
- Complexion Renewal Pads
- Daily Power Defense (1-2 pumps)
- Pigment Control Créme (2 pumps)
- Pigment Control + Blending Créme (1 pump) mixed with Tretinoin or Wrinkle + Texture Repair (2 pumps)
- Hydrating Créme (as needed)
- Spf
Additional Info and Tips:
The pigment control system is a very Intense regimen. Your skin will go through an ‘anticipated reaction”. This means for the first few weeks, your skin may become sensitive, irritated, and peeling may occur. You Must wear Spf every day as your skin will be more photosensitive while using these products.
Tips to make this process easier:
● If your skin is especially sensitive, start Gsr and Daily Power Defense alone for 2 weeks before incorporating the retinol and pigment control cremes. If you are using this protocol post-laser skin resurfacing, start the entire protocol when advised by your provider.
● Use the ZO Skin Health Hydrating Créme to soothe and calm your skin.
● Use less retinol for the first week (1 pump instead of 2).
● The Pigment Control Créme should only be used for up to 3 months. Set a calendar reminder and begin transitioning to the non-hydroquinone brightening regimen 90 days from your start date. It is Incredibly important to transition your regimen without abruptly stopping the Use of Hydroquinone.
Transitioning from the Hydroquinone Brightening Program to the Non-Hydroquinone Brightening Program
**** DO Not Skip This Step!! Rebound pigmentation will occur if you fail to transition****
Months 1-3: Hydroquinone Brightening Program
Begin 8 Week Transition Period
Month 4
Weeks 1 & 2: Hydroquinone 3x per week
Weeks 3 & 4: Hydroquinone 2x per week
Month 5
Week 5: Hydroquinone 2x per week
Weeks 6-7: Hydroquinone 1x per week
Week 8: No hydroquinone
| Sun | Mon | Tues | Weds | Thurs | Fri | Sat | |
| Week 1 | HQ | BR | HQ | BR | HQ | BR | BR |
| Week 2 | HQ | BR | HQ | BR | HQ | BR | BR |
| Week 3 | HQ | BR | BR | BR | HQ | BR | BR |
| Week 4 | HQ | BR | BR | BR | HQ | BR | BR |
| Week 5 | HQ | BR | BR | BR | HQ | BR | BR |
| Week 6 | HQ | BR | BR | BR | BR | BR | BR |
| Week 7 | HQ | BR | BR | BR | BR | BR | BR |
| Week 8 | BR | BR | BR | BR | BR | BR | BR |
HQ: Follow Hydroquinone Protocol BR: Follow Brightening Protocol
zo Non-hydroquinone Brightening Regimen
Use for at least 2-3 months post Hydroquinone brightening program. The use of this regimen allows skin melanization to occur. During these months, your melanocytes (cells that produce melanin) will become more active. The bright, alive, and retinol skin brightener will continue to work on unwanted pigment. It is Imperative that you transition to this regimen after using the pigment control products. The hydroquinone regimen can be started again after 2-3 months if unwanted pigment remains.
Components of the Protocol:
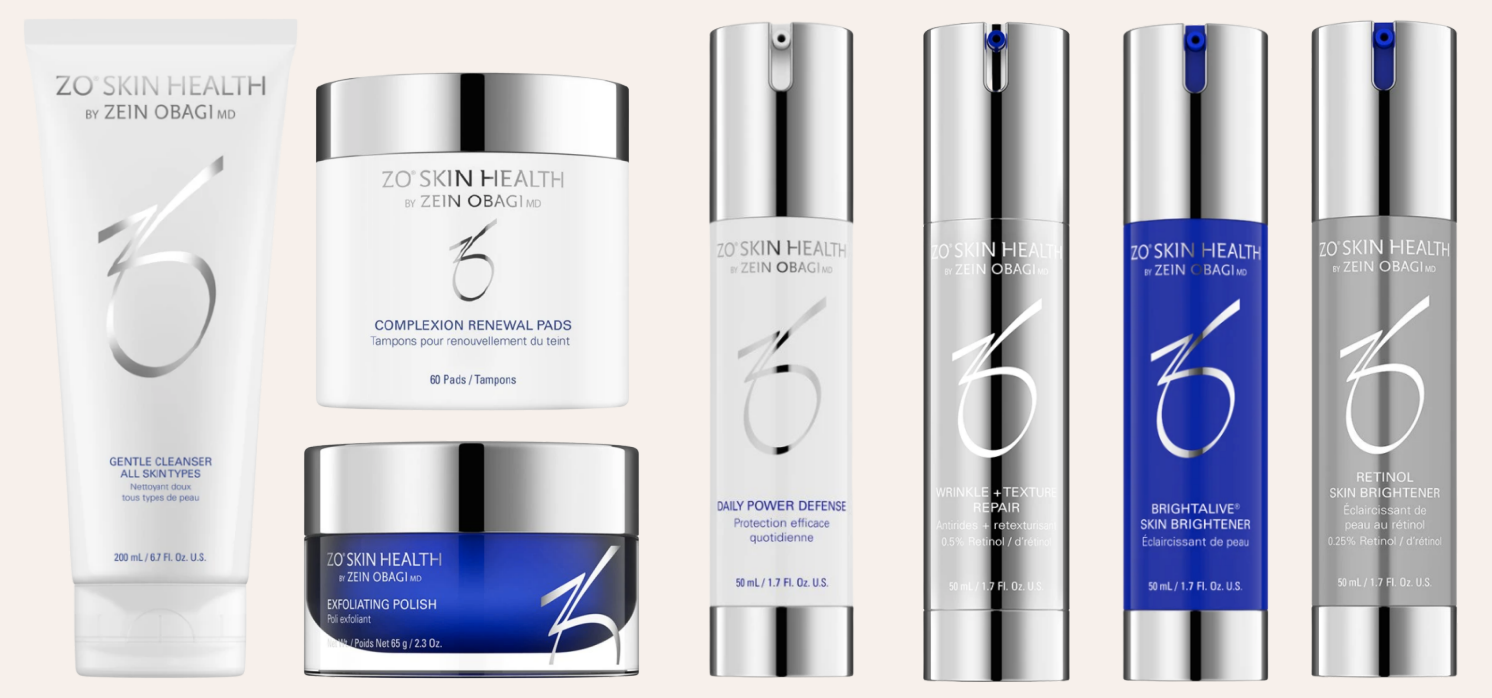
Getting Skin Ready (Gsr): Gentle Cleanser, Exfoliating Polish, and Complexion Renewal Pads
Skin Barrier Strengthener: Daily Power Defense
Retinol: Tretinoin or Wrinkle + Texture Repair
Brighteners: Brightalive and Retinol Skin Brightener (available in 0.25%, 0.5%, and 1%)
Hydration: Hydrating Créme (as needed)
Detailed Instructions for the Protocol:
Daily AM:
- Gentle Cleanser
- Exfoliating Polish – Can be used in the shower and watered down for softer exfoliation
- Daily Power Defense (1-2 pumps)
- Brightalive (1-2 pumps)
- Retinol Skin Brightener (1 pump)
- Hydrating Créme (as needed) + Spf
Daily PM:
- Gentle Cleanser
- Complexion Renewal Pads
- Daily Power Defense (1-2 pumps)
- Brightalive (1-2 pumps)
- Wrinkle and Texture Repair or Tretinoin (1 pump)
- Hydrating Créme (as needed) + Spf